Magnetic Particle Inspection

When looking for a reliable, economical testing method for detecting flaws and discontinuities in your magnetic parts without damaging the part in any way, a preferred method is magnetic particle inspection (MPI).

MPI is a nondestructive test method that detects linear, surface, and near-surface flaws in material that can be magnetized, or ferromagnetic material, such as cobalt, iron, nickel, or certain alloys. During MPI, small magnetic, iron particles are attracted to any defects on or near the surface of your parts.

Applications for magnetic particle inspection include many different industries, including automotive, power generation, medical device, and aerospace industries. Testing is done on a variety of product forms and at almost any stage in the component’s production cycle, including castings, forgings, and weldments.

MPI advantages include:

  • Quick and simple application
  • Ability to detect defects through thin coatings
  • Highly sensitive to surface and slightly subsurface flaws that will appear on the test part
  • Easy automation and high-volume production testing
  • Less costly than other quality assurance testing methods

Limitations to MPI are:

  • Part material must be magnetic
  • Limited detection for subsurface indications
  • The direction of the magnetic field must be accurate
  • Complex test parts sometimes pose difficulty with magnetic properties
  • Demagnetization is often required

Your parts are tested for defects on our wet horizontal machines following these basic steps:

  1. Surface preparation: Your part is cleaned of grease, oil, moisture, and other contaminants. PTI uses TriChloroethylene Vapor Degreasing, also used with the FPI method.
  2. Determine magnetic properties: Calculations are done to know the amount of current required to magnetize your part. Both the adequate strength and correct direction of magnetic field must be used.
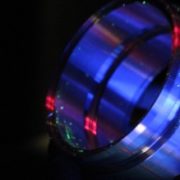
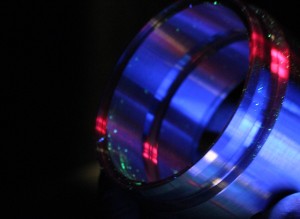
  3. Magnetize component: Your part is magnetized with a magnetizing pulse that is applied in short bursts of a half second to improve particle mobility. It is then bathed with a light oil containing small iron particles which will line up along any defect.
  4. Visual inspection: A UV black light is used to look for defects that will create a leakage field. The iron particles will cluster at any flux leakage point, forming a visible indication to an otherwise undetectable defect.
  5. Subsurface flaw detection: Unlike FPI, MPI can show defects below the surface such as voids in a casting. Indications will lose definition as flaw depth increases.
  6. Demagnetize component: Special equipment that operates in the opposite manner of magnetizing equipment is used to reverse the magnetic field. Remaining magnetic fields can adversely affect machining and welding, and interfere with electronic equipment. Test oil is then removed by vapor degreasing.

PTI gives you multiple solutions to your special processes in one stop. In addition to our Nondestructive Testing, we offer Precision Cleaning, Shot Peen, and Adhesive Bonding.


This is the fourth (and final) in a series providing detailed information on the special processes provided by PTI.
Part One: Dry Film Lubrication Gives Critical Long-Term Protection
Part Two: Get Quality Control for Your Parts with Nondestructive Testing
Part Three: Liquid Penetrant Inspection Is Economical and Versatile

Liquid Penetrant Inspection Is Economical and Versatile

FPI-1024x746_cropped-300x219Liquid Penetrant Inspection is a nondestructive testing method used to reveal surface discontinuities by bleeding out a colored or fluorescent dye from the flaw. This process is called capillary action, where a liquid is drawn into a clean, dry defect through low surface tension.

Liquid Penetrant Inspection (LPI), also known as Fluorescent Penetrant Inspection (FPI), is one of the two most common nondestructive testing methods, a process that tests for discontinuities without damaging parts in any way. The other method is Magnetic Particle Inspection (MPI), which is limited for use on magnetic parts.

If your parts are nonmagnetic, the only option is Liquid Penetrant Inspection. It relies on using either an ultraviolet light for a fluorescent liquid penetrant, or a white light for a visible dye penetrant.

The two penetrants are classified by their sensitivity levels. Visible penetrant is red in color and represents the lowest sensitivity. Fluorescent penetrants are yellow-green and contrast with the darkened environment, representing the highest sensitivity to defects.

Liquid Penetrant Inspection and Fluorescent Penetrant Inspection consist of 6 steps:

  1. Pre-cleaning the part to be free of all dirt, oil, grease, paint, rust, or any loose scale that could prevent the liquid from penetrating the defect or cause false indications. For most parts, PTI uses vapor degreasing with TriChloroethylene. Solvents such as MEK or Acetone are used to clean Titanium parts where Tri-Chlor may have adverse effects. Any defects present must be open to the surface, dry, and free of contamination.
  2. Application of penetrant to the part’s surface has a dwell or soak time that allows the penetrant to permeate into any cracks and voids. The dwell time can be from 5 to 30 minutes, depending on the material of the part and the size of the potential flaws. Smaller defects require a longer penetration time.
  3. Excess penetrant is removed from the part’s surface. This prevents the possibility of masking defects from the developer by leaving a background. Without proper removal, false indications may also occur. PTI generally uses water to wash the penetrant off.
  4. Application of developer follows drying time in a convection oven. A thin, light coating of developer is sprayed on the part and a dwell time is again observed. The developer draws the penetrant out, creating a visible indication or flaw in the developer known as a bleed-out.
  5. The part is inspected using visible light on a visible dye penetrant, typically with an intensity of 100 foot-candles or 1100 lux. Ultraviolet or black light is used for fluorescent penetrant examinations. The correct length of time is critical. The length of an indication can increase with time as the penetrant bleeds out, causing an acceptable indication to become an unacceptable defect.
  6. Post cleaning of parts with water to remove all developer, and thorough drying after evaluation.

Liquid penetrant advantages include:

  • High sensitivity to small surface discontinuities.
  • Indications can reveal relative size and shape of the flaw.
  • Parts with complex shapes can be routinely inspected.
  • Few limitations to part materials, i.e., metallic and nonmetallic, magnetic and nonmagnetic, conductive and nonconductive materials may be inspected.
  • Inexpensive and fast inspection of large volumes and large areas of parts.
  • Visual representations of flaws are made on the part surface.
  • Portable and convenient process.

Primary disadvantages of liquid dye penetrant are:

  • Flaws must be open to the surface for detection.
  • Part surface must be accessible for examination.
  • Part material with porous surfaces can’t be inspected with LPI.
  • The part surface must be clean of all contaminants that could mask defects, including removal of any metal from wire brushing, shot blasting, or grit blasting.
  • Surface finish must be smooth before inspection, which could require grinding.
  • Proper chemical handling and disposal is necessary.

PTI offers both Liquid Penetrant Testing and Fluorescent Penetrant Inspection as a valuable tool during new construction and in-service inspections.


This is the third in a series providing detailed information on the special processes provided by PTI.

Part One: Dry Film Lubrication Gives Critical Long-Term Protection
Part Two: Get Quality Control for Your Parts with Nondestructive Testing
Part Four: Magnetic Particle Inspection